Adjusting the shifting and the rear derailleur can seem like a big task, but knowing how the derailleur works and what the different bolts and screws do can help dispel a lot of the mystique that is bike shifting. At its core, the shifting on your bike runs on cable tension. When you use the shifter on the handlebars, it either pulls or releases a cable that in turn moves the derailleur. Adjusting the derailleur comes down to two main adjustments: adjusting the cable tension, and adjusting how far the derailleur can move. Depending on what problems the shifting is having, you would adjust either one of these.

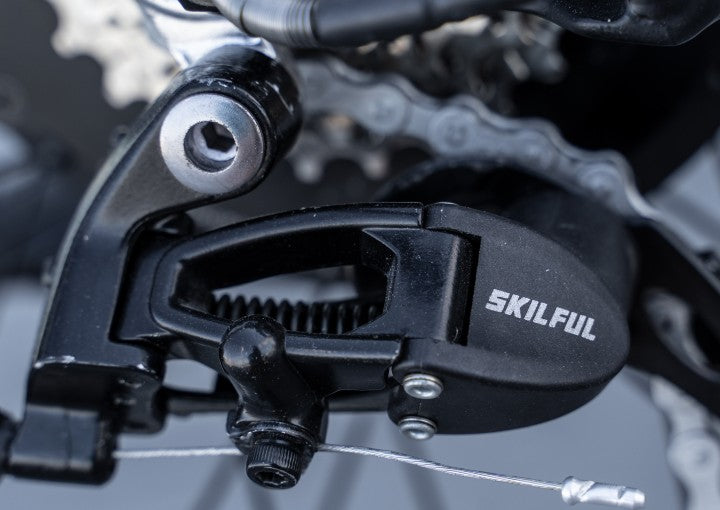
To first know how to adjust the shifting, it is important to familiarize yourself with the derailleur itself, as this is where most of the adjustments will be made.
- Cable Stop/Barrel Adjuster- Space where the housing/cable meets the derailleur. This is the main spot where the tension is set between the derailleur and shifter.
- Cable Clamp - This is where the cable routes through and gets clamped in place.
- High Limit Screw- This limit screw sets how far the derailleur can move towards the smaller rings on the cassette.
- Low Limit Screw- This limit screw sets how far the derailleur can move toward the bigger ring on the cassette.
- B-Limit Screw- This adjusts how far the upper jockey wheel is from the cassette.
- Pulley Arm- The chain is routed through this and is the main section that moves and pulls the chain with it.
Now that you know what the different parts of the derailleur are, it is easier to understand how to adjust it!
There are a few things that can fall under the category of “poor shifting”. This can include skipping/not staying in gear, not shifting into specific speeds, or throwing the chain off of the cassette. We will walk through how to take care of all of these issues!
Here is a video walking through how to do these:
Tools needed for these services:
- Bike Stand/Way to hold bike up
- Phillips Head Screwdriver
- 5mm Allen/Hex Key
Skipping/Not Staying in Gear
Skipping can be an interesting one, as it could be an issue with the derailleur adjustment, but it could be worn components as well. To check to see if it is due to components being worn, check our Chain Install section.
But if you have deemed that your bike is skipping/not staying in gear due to adjustments and not worn parts, this guide will help!
- Shift the rear derailleur into the smallest cassette ring, speed 7.
- Begin pedaling the bike and shift up one speed. If it makes a clicking noise and does not shift up, then it is in fact a cable tension issue.
- Twist the barrel adjuster small amounts while pedaling the bike. The clicking sound should get more frequent and louder, until the chain finally shifts up into the next gear.
- Continue to shift the derailleur one by one to make sure it shifts properly through all of the gears. Add small amounts of cable tension if needed. Be careful to not add too much, as you can add too much cable tension and all of the speeds will be indexed up one.
- As you shift back down the cassette, if any of the gears hold up and do not shift down, turn the barrel adjuster the other direction to take tension away.
- Continue to make these small adjustments until the bike shifts well up and down.
Chain is Throwing off of the Cassette
If your chain is throwing off of the cassette, it means that either the lower or upper limit screw needs to be adjusted. The upper and lower limits crews set how far the derailleur can move in either direction. Which way the chain is falling off changes which limit screw you would adjust. If the chain is thrown into the wheel/spokes, the limit screw marked “L” for low, is the one to adjust. If the chain is being thrown off to the outside of the bike, then the limit screw marked “H” for high would be the one to adjust.
On the other side of things, if your chain will not go into the largest cassette ring in the back, then it is possible the “L” limit screw is too far in, and if the chain will not go into the smallest ring in the back, then it is possible the “H” limit screw is too far in.
To set the limit screws, there is not as much of a step by step procedure. You would just screw in or out the appropriate limit screw until it is properly set. When setting the limit screws, less is more with the amount you turn. You should do these adjustments in quarter turn intervals until the screw is set properly. You just keep giving the appropriate limit screw small turns until it either stops throwing the chain off, or finally lets the chain shift into gear.
Everything DIY E-Bike Repairs
Homepage: eBike Repair Guide
eBike Repair Basics & Assembly
- eBike Specs and Walkthrough
- Tower eBike Serial Numbers
- Recommended Tools eBike Repairs at Home
- eBike Operation Guide
- Initial Build of a Tower eBike
- Tower eBike Torque Specs
- eBike Care and Maintenance
- Quick Reference eBike Repair Guide
eBike Brake System Service Guide
- eBike Hydraulic Brake System Introduction
- How to Adjust an eBike's Hydraulic Brakes
- How to True an eBike Rotor
- E-Bike Brake Rotor Install
- Brake Pad Install for E-Bikes
- How to Resurface eBike Brake Pads and Rotors
- How to Bleed Hydraulic Brakes on an eBike
eBike Drivetrain Service Guide
- How to Clean Your eBike Drivetrain
- Shifting Adjustment on an E-Bike
- Electric Bike Shifter Cable Install
- How to Install a New Chain on an eBike
- E-Bike Derailleur Installation
- Replace the Shifter on an E-Bike
- Replace an Electric Bike Cassette
- Crankset Install on an E-Bike
- E-Bike Derailleur Hanger Adjustment
- Installing Pedals on an Electric Bike
eBike Wheels & Tire Guide
- Flat Tire Repair on an Electric Bike
- New Tire Install on an Electric Bike
- Rear Wheel (with Hub Motor) Removal Guide
- How to True E-Bike Wheels
- Electric Bike Spoke Replacement
eBike Electric Repair Guide
- E-Bike Electrical System Overview
- Intro to Electrical Troubleshooting an eBike
- Methods of Electrical Troubleshooting an eBike
- Electric Bike Error Codes
- Electric Bike Battery Services
- Electric Bike Motor Issues
- E-Bike Will Not Power On
- Troubleshooting Pedal Assist on an E-Bike
- No Throttle Power eBike Troubleshooting
- E-Bike Does Not Pedal Assist or Throttle
- Intermittent Power Loss While Riding an eBike
Miscellaneous eBike Service Guide